I read about this a couple places. At first I was doubtful, and used it planning to have to rewash my hair, but it really does work. I would use this shampoo all the time, but I can't get my husband convinced, and I don't like a bunch of bottles all over the bath.
In an empty shampoo bottle, pour 1 Tablespoon of Baking Soda. Fill the bottle with water and shake. The soda will form a solid cake in the bottom, but it is also in the water. I just shake the bottle a little before each shampoo, and pour it over my head. There are no suds but it washes your hair clean. I condition with regular Conditioner (Suave of course).
The homemade recipes called for straight Apple Cider Vinegar, and I'm sorry, but it smells. It does not come out like they say, it doesn't make a wonderful tingle with the Baking Soda, either. Suave is just over $1.50 and worth it. Honestly, I buy that for shampoo, too. But if you are ever out of shampoo, just mix this up and you can keep adding water to the bottle till the Baking Soda is all gone then start over.
Monday, October 21, 2013
Sunday, October 20, 2013
Homemade Detergent: Not so good
In a previous blog, I spotlighted recipes for dishwasher detergent, Laundry detergent etc etc. After several months of using these recipes, here are the results:
 the glass on the left is clean after using two wash loads of Cascade Platinum. The glass on the right is one of our worst examples of the homemade detergent, but all of our glasses have been feeling chalky for a long time now, and the Cascade has everything feeling clean and salvaged.

I have to go ahead and endorse the Tide Pods, too. I really prefer using the Pods to the soapnuts that I was so crazy about. I love the artificial smell. I'm just going to go with that clean scent.

I have to go ahead and endorse the Tide Pods, too. I really prefer using the Pods to the soapnuts that I was so crazy about. I love the artificial smell. I'm just going to go with that clean scent.
Friday, October 11, 2013
My Little Paw Paw Tree

This is year number three for my pair of Paw Paws. Year one, blooms, but not enough between the two trees to really pollinate.
Year two, a couple paw paws which fell off during a big storm.
Year three, this cluster of four paw paws, whose only flaw was a spittle bug leaving some white at the base of one of them. I was hopeful. They were almost ripe.
Last week I went to check on them, and they were gone. I spotted it from a long way away. Just gone. Then, I noticed that not only had something eaten my fruit, but threw it up next to the tree! After scouring the ground, I found a couple remains and was able to smell and feel the fruit. Pretty sure that the size of the gigantic bite marks were raccoon. It smelled really yummy. Soft to the touch. The rind is still green but the fruit was yellow inside. I had been feeling them and waiting for them to turn yellow.
In the Bible it tells us to wait until the third year and the harvest is ours, so I assume next year is the year!
Planting Cotton in Indiana
I have plants! I did quite a bit of research on planting cotton in Indiana. These plants were started inside (but not as soon as next year), and have been fertilized twice (which I almost never do to my plants, explaining the low yield in my vegetable garden). I planted the cotton in a pattern between tomatoes and okra, not realizing that okra and cotton are related so the pattern wasn't as pretty as I hoped.


Then I surrounded each plant with basil and cilantro to ward off bugs. It's too early to tell if I'll actually get any cotton puffs, but look at the bolls:
Cotton plant. I don't think it is nearly as big as they grow in Cotton Country.

Below is an Okra plant. The leaves are very different, but the flowers are similar. Okra has the dark center, cotton is pure yellow, then when it is fertilized the flower turns pink. They are also related to Hibiscus, which grows well in Indiana.

As the weather cools, the bolls are getting dark spots on them, and turning pink at the base. I know nothing about what will happen. The bolls are heavy, and I had to stake the plants after the last rain because they all tipped over. Somehow I can't see cotton farmers messing with that, and the dried cotton always looks so straight in the field.
I have cotton!!!

For this year, my sister (from Tennessee) is scavenging some more so that I can make a project, but I will have quite a bit. I plan to make face scrubbies unless it really makes a lot.
Wednesday, September 11, 2013
Sewing Your New Zipper
For the last post, we adjusted a zipper's length. I adjusted both ends because I used Make-a-Zipper, which comes in five foot lengths. You can also buy a ready made zipper and adjust it.
We are making a pouch.
You only need one zipper. I was making more than one pouch. See the other blog post to make the tabbed zipper. It should be the width of your project.


We are making a pouch.
You only need one zipper. I was making more than one pouch. See the other blog post to make the tabbed zipper. It should be the width of your project.

Sew right sides together. The computer ate my photo. For positioning, hold it in place and flip it to see if everything will end up where you intend.
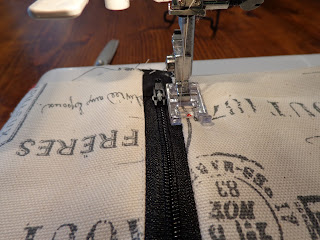
Turn inside out and topstitch the edge. I move my needle over using the zigzag function on the sewing machine (did you know you can do that while sewing straight?) This way, You can use the edge of the presser foot as a guide.

Making tabs at each end makes this step easier: fold the pouch right sides together, and sew from the top all the way around. If you were assembling with the zipper sticking off the edge, the machine would not like the glump of zipper at each end.
OH YES**** Do you notice that the zipper is open? Even planning this blog, I still started around each bag and realized at the final moment that I had it zipped shut. You won't have even a tiny space to wiggle it open on this design.

Turn right side out.

View of the tab

View of tab on other end

Make a Zipper
For many of my patterns, custom size zippers don't fit. Rather than limit myself to the manufactured lengths, I learned long ago how to adjust. Most zippers can be sewn right through. For thicker or metal zippers, the technique I'm going to show works just as well. Simply skip sewing through the teeth and leave a longer tail inside the tab.
Step one:
 completed zipper (I'm making 5 pencil cases).


Step one:

Cut the zipper just a little smaller than your project (or you can cut it the same size if you wish. For my project, I wanted the finished ends of the tab to show.
Step two: cut 4 tabs the width of the zipper and long enough to stick out past the edge of your project (trim the ends when you are finished)

Another view of the finished zipper

Step three: line up two tabs with the zipper in the middle. Sew across the end several times. If you are using a thicker zipper, lift the needle across the teeth. If you have a good amount of teeth past the seam, the tab will stop the zipper pull from running off the end.

Running back and forth. One end (the top probably) will be open. Hold the teeth as close together and as flat as you can and continue as before.

Step four: open tab, smooth flat and sew either the sides or the bottom edge (close to the end so it doesn't show in the final seam)

There you have a zipper of any length, ready to install. For the next blog entry, I'll use this zipper in a pencil case style pouch.
Tuesday, July 9, 2013
Bicycle Spinning Wheel

In one of my back issues of Spin-Off Magazine, in the letters to the editor, a reader sent in her photos of her bicycle spinning wheel she made using their article. These are my clues, and now I am on the case. Searching for the back issue where the pattern appears (I don't remember a notation about the issue).
I really want my wheel to still look like a bicycle. The kids love to use my wheel, but I usually have a bigger project loaded on my bobbin, so it makes sense to convert this ratty old bike I just found in pieces on the curb (with a free bike sign).
I finally took a minute to look through my old Spin-Off back issues, and it must really be important, because the magazine was on top, folded open to that page! Here is the letter to the editor I am using for Phase 3- buying the back issue.


See the important data? Summer 2000. Off to Interweave web-site to buy.
Phase 3
Phase 3 admittedly took me all of 3 minutes. It will take you less. For $12, you get 4 back issues from 2000, the summer one containing the article on the bicycle spinning wheel. I'm still in the check-out, but in 5 minutes I should be reading the article. Here's the link . Let me know if you try this. I'll be posting the construction and use in separate blogs. Isn't the internet wonderful?
Saturday, March 30, 2013
Tapping the Maple tree
Our backyard is blessed with several mature Sugar Maple trees. In the spring, when the nights are still freezing and the days are warm is the perfect time to tap your trees. That is when the sap begins to move from the roots back up into the tree.
Tapping the trees and boiling down one batch of sugar water is a wonderful way of showing your family just how much effort goes into a bottle of syrup. But do not count on a huge batch of syrup from these directions. My first batch came to 1 Tablespoon of syrup after 3 hours of boiling.
Here is what you need:
3/8" Nylon Tee

3/8"I.D (interior diameter)
1/2" OD (outer diameter Clear Vinyl Tubing (this is actually approved on the label for potable water)

 Hubby took me seriously when I said Tiny hole. I ended up enlarging this just a little.
You will need a drill with a 3/8" bit. I used a bit-brace, but if you just have an electric drill, that is fine, too.

 Drill into the tree higher than the bucket, and go in about the depth of the notches on your Tee.


Tapping the trees and boiling down one batch of sugar water is a wonderful way of showing your family just how much effort goes into a bottle of syrup. But do not count on a huge batch of syrup from these directions. My first batch came to 1 Tablespoon of syrup after 3 hours of boiling.
Here is what you need:
3/8" Nylon Tee

3/8"I.D (interior diameter)
1/2" OD (outer diameter Clear Vinyl Tubing (this is actually approved on the label for potable water)

The tubing is shown attached to the Tee, and inserted through the hole I drilled in the lid (ok, hubby drilled it, but I would have.
Also use a clean large bucket, the kind you buy at Menards/Home Depot/Lowes/ etc. I used a clear bucket the first time, or semi-opaque. That would have been better than the one I bought this time because you can see how much fluid is inside.
There is a tiny air hole in the top.

You will need a drill with a 3/8" bit. I used a bit-brace, but if you just have an electric drill, that is fine, too.

I was able to drill the hole myself.


The wood begins to look wet:

The hole will look wet, and begin to well with sugar water. I prefer to get the tap in there before it drips because I don't want the sugar on the outside of my bucket drawing bugs:

Insert tap, and twist and push it in tight, positioning the Tee up for air release.

See the water begin to drip?:

More drips:

The main threat to our tap:

Empty your bucket everyday. I'd do a boil down after 2-3 days but refrigerate your water. It will mold.
Thursday, March 28, 2013
Cool Sewing trick
I'm not sure where I learned this trick. Have you ever tried using your zig zag movement while using a straight stitch? It is doable on newer models, and I'll explain thoroughly. Many times, when I am working on a tight edge, or a thicker one, it makes more sense to move the needle to where I need it than the presser foot. When the presser foot is placed in a more stable position, your stitch line will be more even.

Another really great result of using the lateral shift is that you can use the inside edge of your presser foot to guide your fabric, which is much more consistent than using the marks on the plate.


Another really great result of using the lateral shift is that you can use the inside edge of your presser foot to guide your fabric, which is much more consistent than using the marks on the plate.

The zig zag feature set at center.

The zig zag feature shifted to the right. Depending on which direction I am most comfortable sewing, I either shift it to the right or left. The top photo has the needle shifted to the left.

Photo of the needle shifted to the right in position of 6.0. This is really handy for putting zippers in. I blocked out the shaft so you can see the needle better. Give this a try on a couple scraps. I guarantee you will use it from now on!
Subscribe to:
Comments (Atom)