Wednesday, September 11, 2013

Sewing Your New Zipper

For the last post, we adjusted a zipper's length. I adjusted both ends because I used Make-a-Zipper, which comes in five foot lengths. You can also buy a ready made zipper and adjust it.
We are making a pouch.
You only need one zipper. I was making more than one pouch. See the other blog post to make the tabbed zipper. It should be the width of your project.


Sew right sides together. The computer ate my photo. For positioning, hold it in place and flip it to see if everything will end up where you intend.
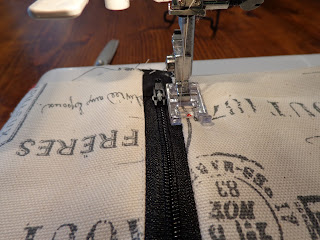
 Turn inside out and topstitch the edge. I move my needle over using the zigzag function on the sewing machine (did you know you can do that while sewing straight?) This way, You can use the edge of the presser foot as a guide.
 
 
Making tabs at each end makes this step easier: fold the pouch right sides together, and sew from the top all the way around. If you were assembling with the zipper sticking off the edge, the machine would not like the glump of zipper at each end.
 
OH YES**** Do you notice that the zipper is open? Even planning this blog, I still started around each bag and realized at the final moment that I had it zipped shut. You won't have even a tiny space to wiggle it open on this design.


Turn right side out.

 
View of the tab

 
View of tab on other end

Make a Zipper

For many of my patterns, custom size zippers don't fit. Rather than limit myself to the manufactured lengths, I learned long ago how to adjust. Most zippers can be sewn right through. For thicker or metal zippers, the technique I'm going to show works just as well. Simply skip sewing through the teeth and leave a longer tail inside the tab.
Step one:
 
Cut the zipper just a little smaller than your project (or you can cut it the same size if you wish. For my project, I wanted the finished ends of the tab to show.
 
Step two: cut 4 tabs the width of the zipper and long enough to stick out past the edge of your project (trim the ends when you are finished)
 
 
                                              completed zipper (I'm making 5 pencil cases).
 
Another view of the finished zipper

 
Step three: line up two tabs with the zipper in the middle. Sew across the end several times. If you are using a thicker zipper, lift the needle across the teeth. If you have a good amount of teeth past the seam, the tab will stop the zipper pull from running off the end.

 
Running back and forth. One end (the top probably) will be open. Hold the teeth as close together and as flat as you can and continue as before.

 
Step four: open tab, smooth flat and sew either the sides or the bottom edge (close to the end so it doesn't show in the final seam)

 
There you have a zipper of any length, ready to install. For the next blog entry, I'll use this zipper in a pencil case style pouch.